- Navigation
- Page Overview
- Asset Table
- Sorting & Filtering
- Bulk Actions
- Row-Level Actions (⋮ menu)
- Example Workflows
- Tips
The Asset Inventory page provides a centralized view of all assets discovered, imported, or manually added to your Bugcrowd Organization. From here, you can search, filter, and manage assets to maintain an accurate, risk-based inventory.
Navigation
To access the Asset Inventory page:
- Log in to your Bugcrowd organization.
- In the top navigation bar, click Assets.
- In the left sidebar, click All assets.
- The Asset Inventory page opens, displaying all assets in your organization.
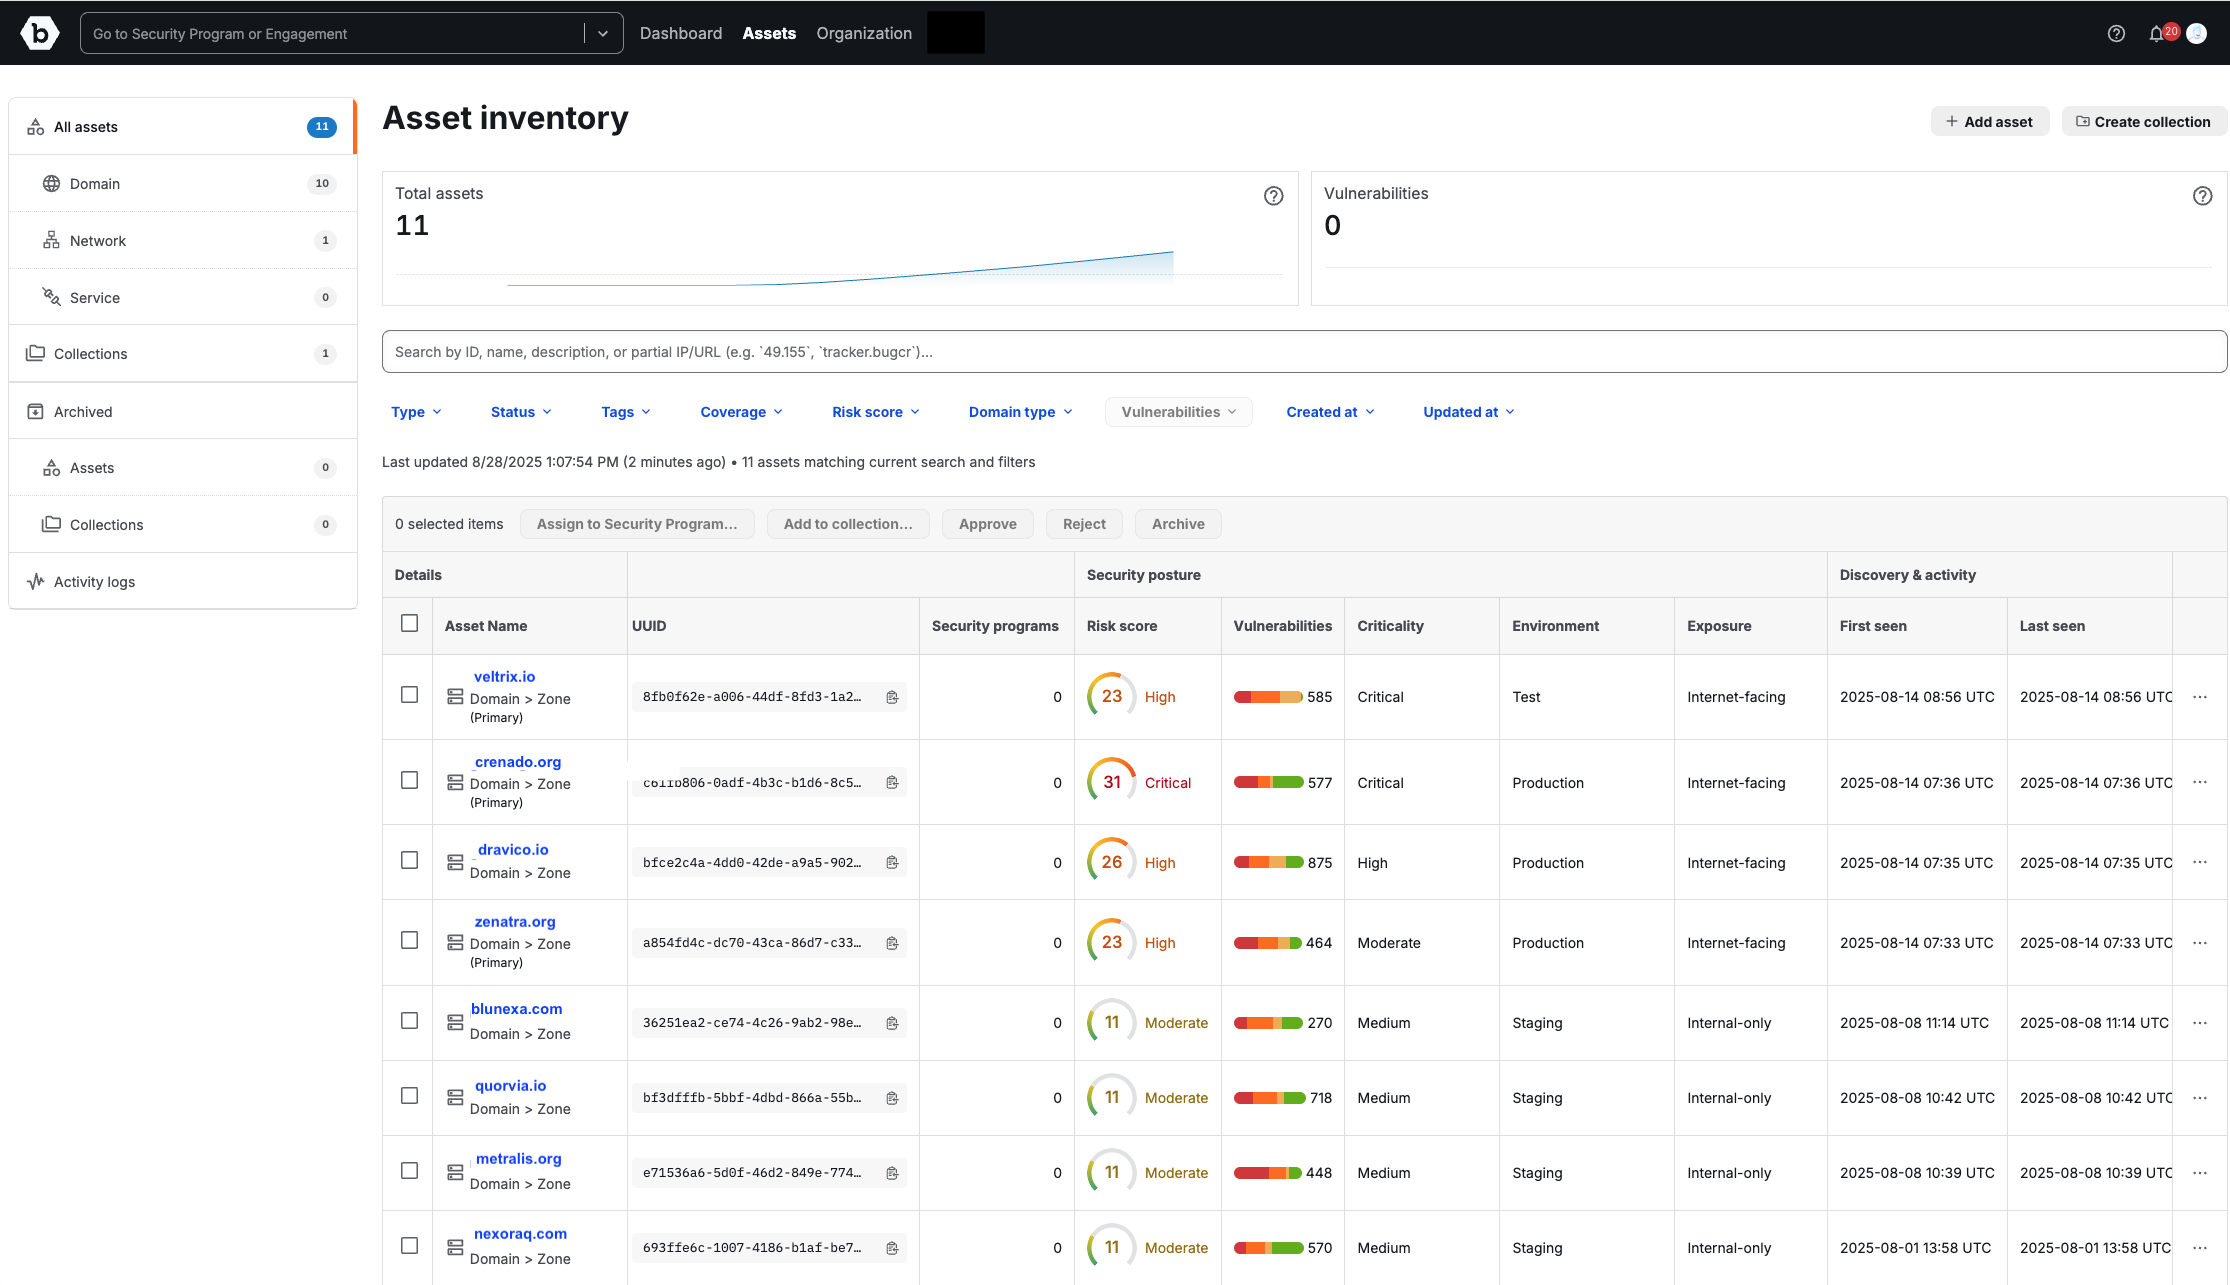
Page Overview
At the top of the page, you’ll find:
- Total Assets: The number of assets currently in your inventory.
- Vulnerabilities: The total number of vulnerabilities associated with your assets.
- Trend Lines: Visual representation of how your Total Assets and Vulnerabilities have changed over time.
- Search Bar: Search for assets by ID, name, description, or partial IP/URL.
- Add Asset: Use the Add asset button to manually add a new asset to your inventory.
- Create Collection: Use the Create collection button to organize assets into collections. (See Collections [Link] documentation for details.)
Asset Table
The Asset Table lists all assets in your inventory and their associated metadata.
Columns
| Column | Description | Sortable |
|---|---|---|
| Asset Name | Displays the asset identifier (domain, IP, web application, etc.). Click to open asset details. | Yes |
| Status | The workflow state of the asset (New, Approved, Rejected, Deprecated, Investigate). | Yes |
| Tags | Labels applied for grouping, categorization, or tracking. | No |
| UUID | A unique system-generated identifier, useful for automation and API lookups. | No |
| Security Programs | Number of Security Programs the asset is assigned to. | Yes |
| Risk Score | Numeric score (0–40) indicating asset risk, categorized as Low, Moderate, High, or Critical. | Yes |
| Vulnerabilities | Count of vulnerabilities associated with the asset, with a severity distribution bar. | No |
| Criticality | Business impact level (Critical, High, Moderate). | Yes |
| Environment | Deployment context of the asset (Production, Staging, Development, Test). | Yes |
| Exposure | Whether the asset is Internet-facing, Internal-only, or Partner-network-exposed. | Yes |
| First Seen | Timestamp when the asset was first discovered. | Yes |
| Last Seen | Timestamp when the asset was most recently confirmed. | Yes |
| Created At | Timestamp when the asset record was added to the inventory. | Yes |
| Updated At | Timestamp when the asset record was last modified. | Yes |
| Discovery Source | How the asset was added (Bugcrowd EASM, Data import, Manual entry). | Yes |
Sorting & Filtering
The Asset Table supports both sorting and filtering for faster navigation.
Sorting
- Click a column header to sort ascending/descending.
- Note: All columns are sortable except: Vulnerabilities, UUID, and Tags.
Filters
Available filters include:
- Type: Zone, Record, Web Application, IP Address, ASN
- Status: New, Approved, Rejected, Deprecated, Investigate
- Tags: Filter by labels
- Coverage: Any, Assigned, Not Assigned
- Risk Score: Critical (31–40), High (21–30), Moderate (11–20), Low (0–10)
- Domain Type: Primary or Non-primary
- Vulnerabilities: Filter by priority (P1-Critical, P2-Severe, P3-Moderate, P4-Low)
- Created At: Filter by creation date/time range
- Updated At: Filter by last updated date/time range
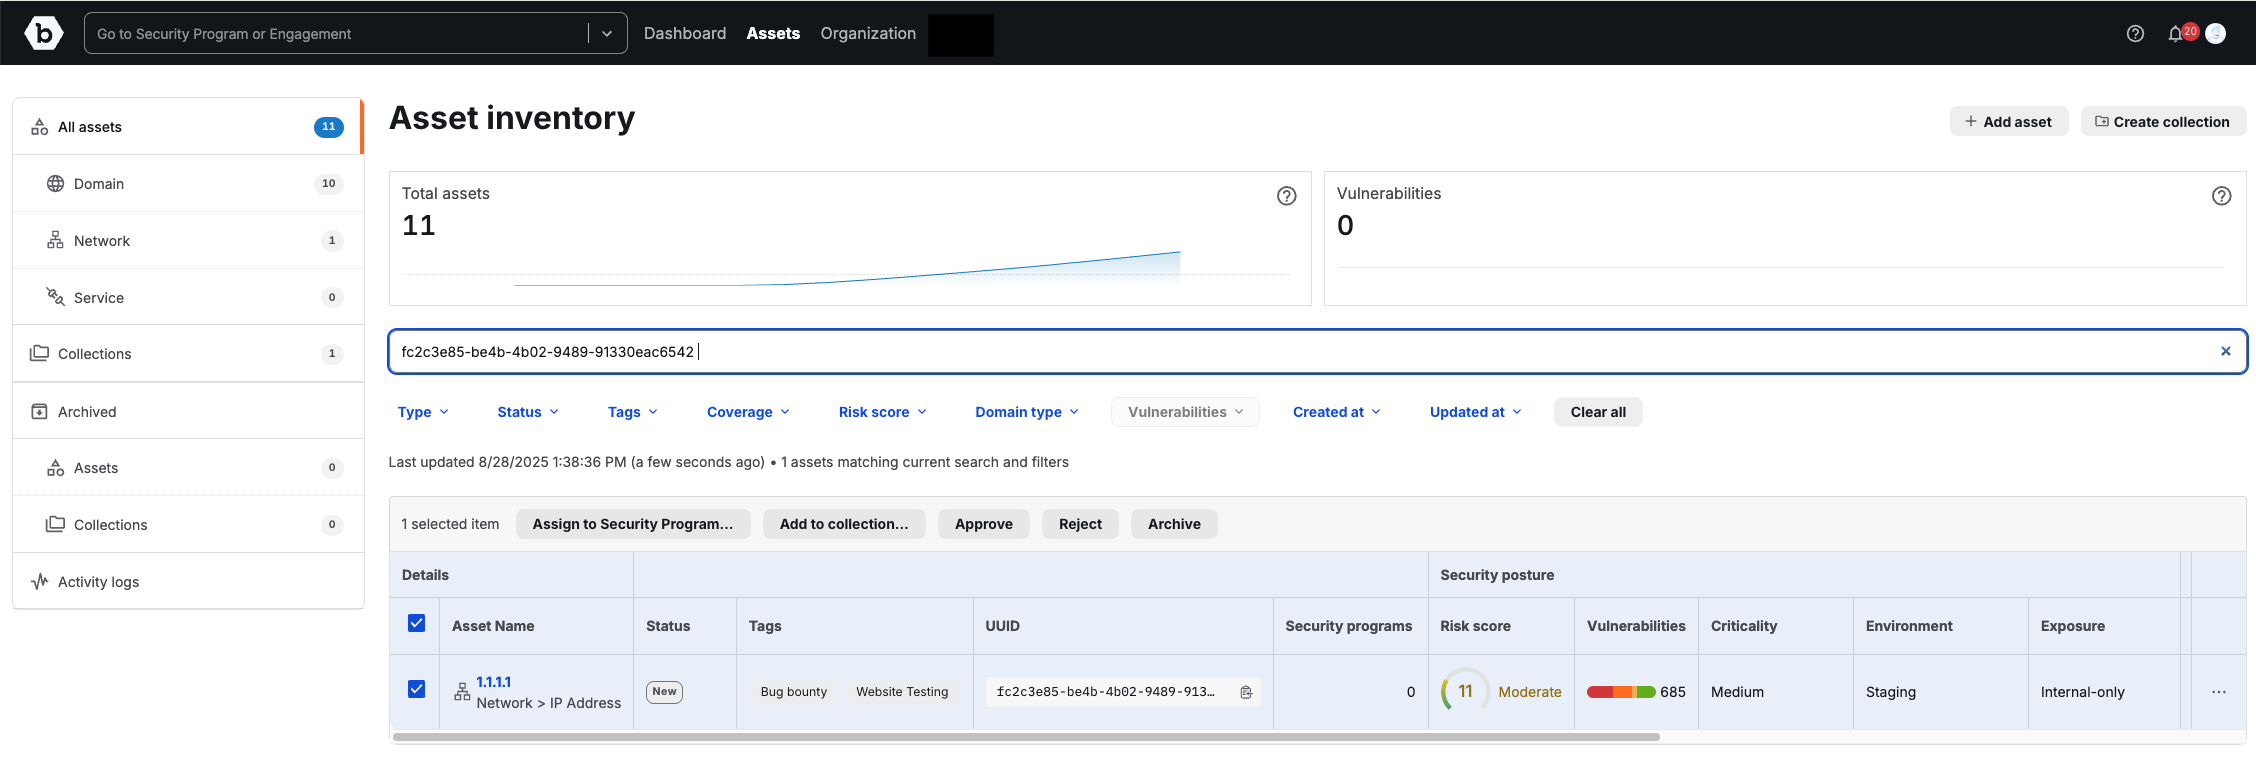
Bulk Actions
You can take actions on one or more selected assets:
- Assign to Security Program: Add assets to a Bugcrowd Security Program
- Add to Collection: Group assets into collections for tracking
- Approve / Reject: Manage workflow state
- Archive: Move assets out of active inventory
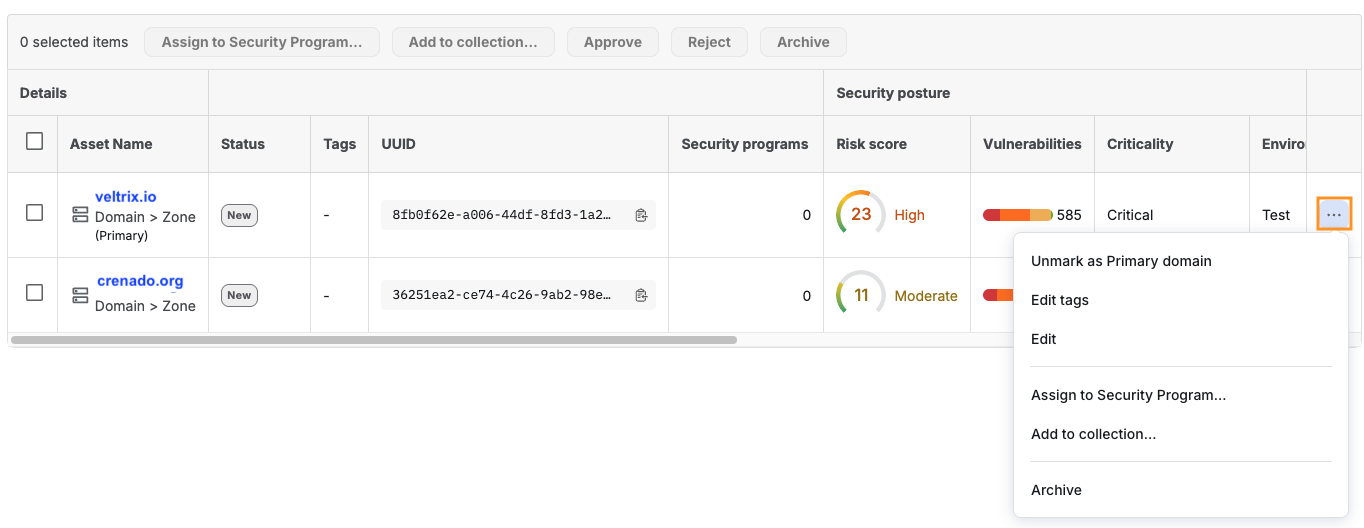
Row-Level Actions (⋮ menu)
Each asset row also includes additional actions:
- Unmark as Primary domain (only displays if a zone is designated as a primary domain)
- Edit tags
- Edit (enables you to edit asset details)
- Assign/remove from Security Program
- Add to collection
- Archive asset
Example Workflows
Search and Approve a New Asset
- Use the search bar to find the asset by UUID, domain, or IP.
- Select the asset from the table.
- Click Approve to move it into the approved state.
Find Highest-Risk Assets
- Open the Risk Score filter.
- Select Critical (31–40).
- Review the highest-priority assets first.
Bulk Assign to a Program
- Select multiple assets using checkboxes.
- Click Assign to Security Program.
- Choose one or more target programs.
Tips
- Use Tags to organize assets across teams, environments, or initiatives (e.g., Production, Website Testing, Bug Bounty).
- Combine filters (e.g., Risk Score: Critical + Environment: Production) to quickly identify high-priority targets.